Sunday, May 18, 2014

How to recover a broken USB stick; How to recover an unusable, unformattable USB drive, How to recover a USB Flash Disk not found error

This actually happened to me while i was trying to make a bootable Win 7 usb stick, power dropped then drive was completely unusable, unformattable and reporting 0 bytes capacity. But it could actually happen due to countless other reasons. Anyways, i`ll do my nearly very best to include everything you need to know about how to get your drive properly working once again.

This method is kinda last resort as it involves flashing the ROM, you should try first the links down the page. However this, if properly executed, should have the best chances to get it working properly.

1. First of all you should download a tool called Chip Genius.

2. After unzipping, launch, after launching you should identify your USB stick drive. It will be something like :


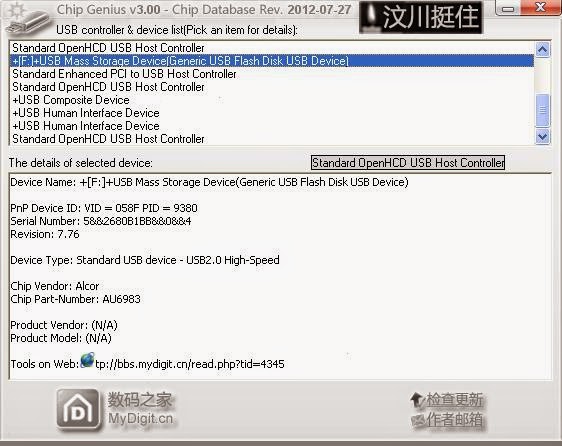
3. Write down your VID, PID, Chip Vendor and Chip Part Number.
4. Go to this site and insert your VID and PID and press Search
5. After the results are displayed, identify your Chip Vendor and Chip Part Number as well as your Disk Size (not a must have), the last column should display the utility to repair your drive.
6. google that utility and download it from flashboot.ru
7. after download, run it, after run it should display drive info and allow you to format/use the drive again.
*Note : Usually in the utility you download there is a preset VID/PID (standard is 058f/6378). You could try to manually add your VID/PID in the program manually (by clicking Driver) but in practice this method when working with some equipment leads to error. I highly recommend to replace default VID/PID by downloading this tool Alchor Change PID/VID Rework.


Other programs to try :

1. Super Stick Recovery Tool V1.0.2.19.rar <= Made by kingmax, its not a must to have a kingmax drive. Can work for others aswell.
2. Dr UFD available from here. Pick USB 2.0 or 3.0 depending on what you got.
3. Transcend`s Online Recovery Tool
4. (XP)Start -> Run -> type “diskmgmt.msc”.. then right click on your usb, change drive letter and paths
    (Win 8/8.1) Right click on Desktop(left down corner) + Run/ Win key + w search run or diskmgmt directly then right click on your usb, change drive letter and paths. Sometimes its as simply as that.
5. For Windows 7/8/8.1 users : Open Elevated Command prompt (command prompt with admin rights)

type DISKPART
type LIST DISK (and see what disk # is your USB drive.)
type SELECT DISK # (your USB drive number from the previous entry)
type CLEAN
type CREATE PARTITION PRIMARY
type SELECT PARTITION 1
type ACTIVE
type FORMAT FS=NTFS
type ASSIGN
type EXIT


All these should 90% fix your drive. Leave a feedback if it helped.

Cheers.


Tuesday, May 13, 2014

How to get rid of display "no signal" while installing nvidia drivers ; How to get rid of "no signal" after windows logon

There can be several things that lead to this issues.


1. This happened to me on a new computer (specs do not matter) while connecting via hdmi port to a kinda old LG plasma tv.

Issue : Basically each time i tried to install the graphics driver, while "installing graphic drivers' the ding that usually announces "device disconnected" (usb, hdmi port etc) could be heard, 1 second later the display went "no signal". Unplug + replug did not work, only thing that could be done was restart, after which if the driver was installed the screen went no signal after logon or if the driver was not installed (or uninstalled via safe mode) reinstalling it would lead to same issue over and over. In the meanwhile the monitor was displayed as a Generic Non-PnP Monitor.

Fix :
Steps to perform :
1. Remove previously installed graphic drivers/chipset drivers.
2. Download North Bridge/South Bridge drivers.
3. Install the drivers/filters after which reinstall drivers.

1. How to remove drivers ?
Get this tool Display Driver Uninstaller
After you download it, run and restart in safe mode to be sure they get removed. Even if you have a nvidia graphic card its worth uninstalling amd/ati/intel as chipset could vary.

Amd has a similar utility called AMD Clean Uninstall Utility but i have found DDU to work slightly better.

2. Download Motherboard chipset drivers.

I got a Gigabyte 870A-UD3 mainboard. The revision can be found by opening the case and taking a look in a corner of the mainboard. Mine said rev 2.1.

The important thing here. Even if AMD has an updated version of "Chipset drivers" on their site corresponding to my mainboard released in 2014, that one includes just the South Bridge drivers, you will actually need the PCI-E filter driver for North Bridge so i recommend sticking to what your mainboard supplier site suggests, even if drivers are a bit older.

After download and running setup these should be clearly visible :

The North Bridge usually paired with South Bridge typically handles communications among the CPU, RAM and PCI-Express videocards. Its easy to see why it is so important. The usb filter driver is the south bridge driver.
This is a schematic of how NB-SB is usually linked.

After installing these, restart. 

3. After you can safely install your latest graphic drivers. Device Manager will then go to Generic-PnP Monitor and the NB Filter driver should be something similar to :

No more "no signal issues". Everything works smooth.

This thing worked for me. That however does not mean it should automatically work for you too, but it is worth a shot, is it not ? Good luck.


Tip for nvidia users : If you got a double/triple etc display setup and you are trying to force digital sent to the displays, this might come in handy :


1.Start regedit.  (You need administrator access under Windows 7/8/8.1.)

2. Navigate to HKEY_LOCAL_MACHINE\SYSTEM\CurrentControlSet\Control\Video
Under Video you'll see a number of sub-folders with long names like {B1E0FF3B-2B31-4B0D-8B9C-B09BBB60CB07}.  Each of those has a sub-folder called 0000.  Most of the 0000 folders will be nearly empty, but one of the 0000 folders contains hundreds of entries that have names of programs in them (e.g. _3DMark05.exe, playNow.exe, etc.).  Find that one.

3. In the 0000 folder you found in the previous step, right-click, and from the context menu, select New, then Binary Value.

4. When the new key is created, change its name to DevicesConnected

5. Right-click on the new key and click Modify...

6. A dialog box will pop up that says "0000" -- it's waiting for you to type data.

7. Type "00 00 03 00", then click OK.  According to the posters in that thread, you can actually type 4 different values depending on your monitor configuration:

2x digital monitors -> "00 00 03 00" (0x30000)
2x analog monitors -> "03 00 00 00" (0x3)
digital/analog -> "02 00 01 00" (0x10002)
 analog/digital -> "01 00 02 00" (0x20001)

8. Click OK, exit RegEdit and reboot.

This last solution was taken from another blog, however i do not have the link to it as i saved it in a .txt. The moment i will have that link i will put it here.

Will write a "how to force EDID" a bit later on. Topic related :)

Cheers.